Showing posts with label Linux/GNU. Show all posts

Wednesday, March 20, 2024

Converting GPIO from the legacy sysfs ABI to the ioctl ABI in Diminuto and Hazer

It could be that no one but me is using my "Hazer" GNSS library and toolkit, or the "Diminuto" C-based systems programming library on which it depends. But just in case: I'm close to finishing testing of the develop branch of both repos, both of which have some major changes to how General Purpose Input/Output (GPIO) - the generic term for controlling digital input and output pins in software - and merging develop back into the master branch.

This was all motivated by my being one of the lucky few to get a backordered Raspberry Pi 5, and putting the latest version of Raspberry Pi OS, based on Debian "bookworm" and Linux 6.1, on it, only to find when unit and functional testing my code that the deprecated sysfs-based GPIO ABI no long worked. This wasn't a big surprise - I had read at least two years ago that the old ABI was being phased out in favor of a new ioctl-based ABI. My code makes heavy use of GPIO for a lot of my stuff, e.g. interrupts from real-time sensors, the One Pulse Per Second (1PPS) signal from GNSS receivers, status LEDS, etc. So it was finally time to bite the bullet and replace all the places where I used the sysfs-based Diminuto Pin feature (diminuto_pin) with a new ABI using the ioctl. Hence, the Diminuto Line (borrowing a term from the new ABI) feature (diminuto_line).

Line is now used in place of Pin in all of the Diminuto functional tests that run on  hardware test fixtures I wired up many years ago just for this purpose, and all the functional tests work. The Hazer gpstool utility has similarly been converted to using Line instead of Pin and has been tested with an Ardusimple board using a u-blox UBX-NEO-F10T GNSS receiver.

IMG_5717

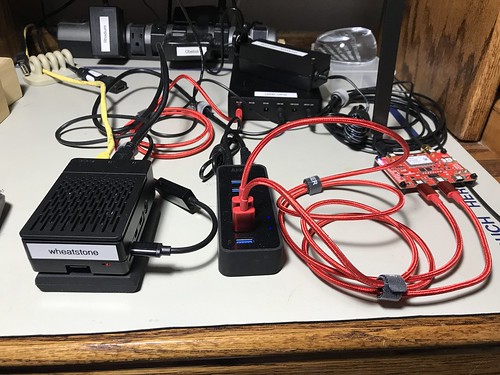
(That's a Pi4 on the left connected to my test fixture, and a Pi5 on the right connected to the GNSS receiver.)

Two complaints.

[1] The new ABI is woefully under documented. However, I found some code examples in the Linux kernel source repo under tools/gpio that were essential to my understanding. (I chose not to use the new-ish libgpiod for my work, for reasons, but that is a story for another time. I have no reason to believe that it's not perfectly fine to use.)

[2] The way the ioctl GPIO driver is implemented on older versus newer Raspberry Pi OS versions makes it difficult - I am tempted to say impossible, but maybe I'm just not that smart - to write code that easily runs on either platform using the new ABI. Specifically, the GPIO device drivers in the OSes use a different symbolic naming scheme, making it impossible for application code to select the correct GPIO device and line offset portably on the two platforms. But maybe I'm just missing something. (I hope so.)

I like the new ioctl ABI, and expect to use it exclusively moving forward, even though this will orphan Pis I have that might run older versions of the OS. (I think I have at least one example of every Pi version ever sitting around the Palatial Overclock Estate. Ten of them run 24x7 in roles such as a web server, an Open Street Map server, a Differential GNSS base station, and an NTP server with a cesium atomic clock for holdover.) I have tagged the last version of both repos that still use the sysfs ABI.

That's it.

Update (2024-03-23)

I merged the develop branch in to the master branch this morning. Both the Diminuto build and the Hazer build passed sanity and functional testing (and I'm currently running the long-running "geologic" unit test suite against Diminuto). I had tagged the old master branch in both repos with the name sysfsgpio in case I needed to build them, but I don't anticipate any further development of the old code.

Saturday, July 22, 2023

Using Microsoft's Windows Subsystem for Linux on Windows 11

I recently bought a new laptop that runs Microsoft Windows 11.

And I didn't immediately install a Linux distro over top of Windows.

Shocking, I know, for a guy who for years has been, and remains, firmly in the Apple ecosystem: laptop, desktop, phone, and tablet. And who, for the past few decades, has been writing software for the Linux ecosystem (including for Android). But I didn't own a hardware platform that can run Windows 11, which only works on systems that have a Trusted Platform Module (TPM). And a lot of the commercial tools for embedded systems, and vendor tools for GNSS devices, that I use only run on Windows.

I bought a 2022 HP Envy x360 Convertible Model 15. That's a laptop with a 15.6" touch sensitive screen that folds up to convert into a tablet. It's the first hardware platform I've run my code on that uses an AMD processor: a Ryzen 7 5825U. It came with Windows 11 Professional. It has 64GB of RAM, and a 2TB PCIe SSD.

So of course almost the first thing I did was get Microsoft's Windows Subsystem for Linux (WSL) working on it. This allows you to run a full blown Linux/GNU distro - not an emulation layer - with a Linux kernel, in a highly optimized virtual machine environment native to Microsoft. Then I got my own software running on it, my Diminuto and Hazer repositories.

It was mostly straightforward, although getting a USB device (in my case, a GNSS receiver dongle) attached to the Linux environment was a little weird - definitely weirder than doing the same thing using the commercial VMware software, which I have done many many times.

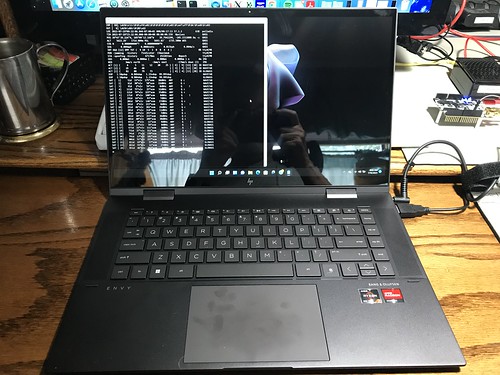
Here's a snapshot of my GNSS software, gpstool, running under Ubuntu Linux, under Windows 11, on the new laptop.

Hazer on HP Envy x360 15 Convertible

I have come to think of the WSL window as the "system console" for the running Linux. If you do an ifconfig command in this window, you can get the local IP address for the Linux instance. Using that address, you can ssh into Linux from Windows and have multiple concurrent Linux sessions. I use the popular Windows app PuTTY - which I also use to connect to serial-attached devices - but anything similar, like using the Windows' native ssh command from a PowerShell console, should work.

You can easily tell that the NMEA 0183 data stream from the GNSS device is running through some kind of USB bridge software layer under Windows that adds significant latency. My GNSS software displays, second by second, both the local system clock (LOC) and the GPS time from the incoming NMEA data (TIM). On this system, they consistently differ by one second, TIM running one second late. I have seen this also when running under VMware, but never when running natively on a system. Definitely won't be using this approach for precision timing, but it should be fine for geolocation.

I've found an issue with one of my USB-attached GNSS receivers, that the optional Windows usbipd utility, which you use to manage the connection of USB devices to WSL, refuses to attach to Linux: "device is in an error state". It's the one dongle I have that uses the Data Carrier Detect (DCD) indication to provide the GNSS one-pulse-per-second ("1PPS") signal. It works fine natively with Linux on, for example, a Raspberry Pi. Other USB-attached GNSS devices have worked fine.

Otherwise: so far, so good.

Friday, August 19, 2022

Playing with a RISC-V SBC running Linux

Recently I began playing with a VisionFive RISC-V-based Single Board Computer (SBC). It was designed by StarFive. I purchased it from ameriDroid.

StarFive VisionFive 2-core RISC-V SBC "boron"

RISC-V ("risk five") is a relatively new Instruction Set Architecture (ISA), developed by a team at UC Berkeley, that is entirely open source, unlike Intel and ARM processor ISAs. This is the first RISC-V board I know of that is designed to run Linux (in this case, based on the Fedora distribution). It has two 64-bit 1GHz SiFive U74 CPU cores and eight gigabytes of RAM.

"boron" is my code name for this project. (Every project gets a code name.) I added the nylon feet to hold the board up off the anti-static mat on my workbench. I started out with a keyboard, mouse, and HDMI display attached to the board, but since it supported SSH right out of the box, I quickly reverted to using the command line to build and test my SW, my preferred approach. Also, it reduces the cable clutter on my workbench, which is supporting another project at the moment.

The two projects of mine that I use the most, Diminuto (a C systems-programming library) and Hazer (a GNSS toolkit), were unusually easy to clone, build, and run; unlike most other Linux distros, I didn't have to install any optional packages (much to my surprise). I have successfully completed running all the unit tests for both projects, and am now moving on to functional testing and practical use.

Since my work tends not to be very CPU intensive, I haven't run any performance tests. I'll probably leave that to someone else. I was more worried about SW functionality. But note that this board is more expensive, and and its processor slower, than the ARM-based Raspberry Pi 4 SBCs I use these days.

But the ARM processor design, and the BroadCom implementation of it, on the Pi is closed, and I appreciated the chance to try my stuff out on the open RISC-V, after having read so much about it over the past few years.

Update: 2022-08-20

Just to provide some evidence that I have non-trivial stuff running on the VisionFive, here's a screen snapshot of gpstool running on the board.

Screen Shot 2022-08-19 at 16.22.19

gpstool is the Swiss Army knife of the Hazer toolkit, which is built on top of Diminuto. Here, it's processing input in real-time from a GlobalSat BU-353W10 GNSS receiver. The receiver, a USB dongle, is based on the widely used U-blox UBX-M8030 module.

Update (2023-03-06)

I participated in crowd funding the StarFive VisionFive 2 SBC, which has four 1.5GHz RISC-V processor cores and 8GB of memory.

Calcium

I got the board a few weeks ago and just recently got around to booting up the Debian-based Linux image provided by StarFive. Next step is to get my own software working on it.

Tuesday, January 25, 2022

Fun Facts to Know and Tell: RPi on an SSD, Microsoft Linux

As an aside from my main projects - mostly my GPS and LTE-M efforts - I've been working on a couple of things that I am a little surprised to have worked as well as they have (even though they may not be perfect).

Raspberry Pi Running From An SSD

The latest Raspberry Pi board - the 4B - introduced a firmware-based boot loader than can be easily configured to boot from something other than the resident micro SD card. It was pretty easy to configure it to boot from a USB-attached SSD.

Here's an image of one of my Raspberry Pi 4B SBCs sitting on top of a Samsung T5 that it booted from and is running off of. (The T5s have since been replaced by the newer Samsung T7.)

Untitled

I also found some instructions to enable the SATA TRIM command on the SSD so that the OS could get sectors on the SSD erased as a background activity.

It's not perfect: the SSD pulls enough power that I had to add an externally powered USB hub to run other stuff like GNSS receivers and LTE-M radios. But I'm running a full blown Ubuntu OS instead of Raspberry Pi OS (a.k.a. Raspbian). I run Ubuntu elsewhere on a Raspberry Pi using a micro SD card, but this is a lot more spacious, not to mention a lot faster.

Microsoft's Linux Distribution

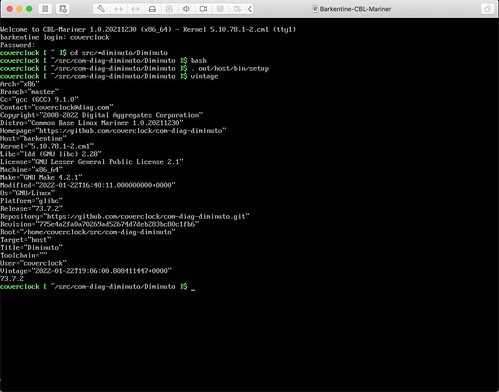
Remarkably, Microsoft has created its own Linux distro for the x86_64 target: the Fedora-ish CBL-Mariner (for Common Base Linux). It's intended as an internal Linux distro for Microsoft's Azure cloud infrastructure. I got it running as a virtual machine under VMware Fusion on my old desktop Mac. It works pretty well; I got my Diminuto C library and my Hazer GPS project running on it with very little effort.

Screen Shot 2022-01-25 at 10.05.16

It's not perfect: weirdly, it can't display the Unicode degree symbol, which is used in a couple of places in my Hazer code (gotta believe this is just a Unicode font issue). And the IPv6 unit tests in Diminuto don't pass 100% (current thinking this has nothing to do with CBL-Meridian, but with a change I made in my company web site). But otherwise I'm processing input as usual from a GNSS USB dongle.

Update 2022-01-25: The degree symbol display was a day-one bug in my Hazer code, related to setting the locale, that didn't manifest under Debian-based OSes. (If I had followed my own documentation, this would not have occurred.) The IPv6 issues were breakage caused by my own changes in the Digital Aggregates web site to support HTTPS and were unrelated to either CBL-Meridian or support in Diminuto for IPv6.

Tuesday, March 23, 2021

Where the RF Meets the Road

My Hazer project (com-diag-hazer) - the basis for all my GPS/GNSS work that I've written about - depends mightily on my Diminuto project (com-diag-diminuto) - my C systems programming library and framework - for its infrastructure. Testing some of the Hazer features finally got complicated enough that I built a dedicated test fixture for that project, just as I had to build a little test fixture for  Diminuto that I described in Where the Silicon Means the Road.

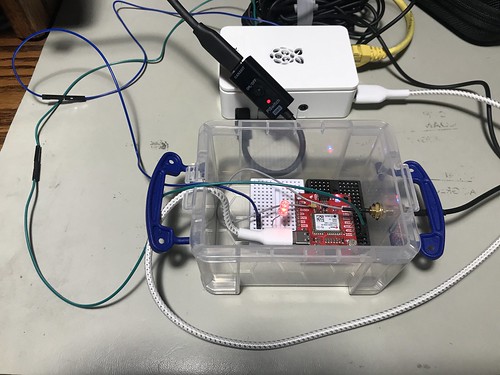
Diminuto GPIO/Hazer 1PPS Test Fixture

While Hazer's gpstool utility supports a wide variety of GPS/GNSS receivers, the one I chose for the test fixture is a SparkFun board equipped with a u-blox NEO M9N device. Here is some gpstool output generated while exercising the M9N.

Hazer gpstool using a u-blox M8N

I chose the M9N because it can receive and process transmissions from the satellite constellations of the U.S. GPS (a.k.a. NAVSTAR) system, the Russian GLONASS system, the European Galileo system, and the Chinese BeiDou 2 (a.k.a. COMPASS) system simultaneously. This tests more code paths in the underlying Hazer library and in gpstool.

Diminuto GPIO/Hazer 1PPS Test Fixture

The M9N is powered by a USB C connection to a dedicated Raspberry Pi 4B running Raspberry Pi OS, the Debian-based version of GNU/Linux formerly known as Raspbian. The USB connection is also the serial communications channel between the Pi and the M9N. The Pi runs headless; when necessary, I ssh into it from my desktop Mac and use the command line interface (although in a pinch, I have connected up a display, keyboard, and mouse to the Pi, or even attached a USB-to-serial adapter to its console port pins).

Diminuto GPIO/Hazer 1PPS Test Fixture

You can see the SMA Radio Frequency (RF) connector emerging from the container, where it connects to the coaxial cable of the GNSS antenna used by the M9N. The small multi-band active patch antenna sits on the top shelf of my workbench within view of the window.

u-blox Multi-band Active GNSS Antenna

You can also see a green wire and a blue wire that run from the M9N container to the Raspberry Pi.

The green wire connects the 1PPS ("one pulse per second") signal from the M9N to a General Purpose Input/Output (GPIO) pin on the Raspberry Pi. 1PPS is a standard precision timing signal derived from the GNSS solution by the receiver (although not all of them export it, and when they do, the mechanism varies). I make use of 1PPS in all of my GNSS-disciplined Network Time Protocol (NTP) micro servers that I've written about previously, including the one that incorporates a chip-scale cesium atomic clock. When gpstool is configured to monitor the 1PPS signal, it uses Diminuto's GPIO feature to interrogate the input GPIO pin using the select(2) system call inside a dedicated POSIX thread (which is also a Diminuto feature).

The blue wire connects an second, output, GPIO pin on the Raspberry Pi to an LED in the little container where the M9N is mounted. When gpstool monitors 1PPS, it can be configured for the thread to strobe the second GPIO pin to follow the 1PPS signal. This is not just a test of Hazer and gpstool, but a test of Diminuto's GPIO feature as well.

Diminuto GPIO/Hazer 1PPS Test Fixture

My hardware engineer colleagues will confirm that I'm not a hardware guy by any stretch of the imagination. But hacking together these little hardware test fixtures gives me peace of mind. As long as I see that LED blinking at 1Hz, I know that, while my code is not perfect, it is at least sane.

Thursday, March 04, 2021

The OpenStreetMap Moving Map on Mobile Devices

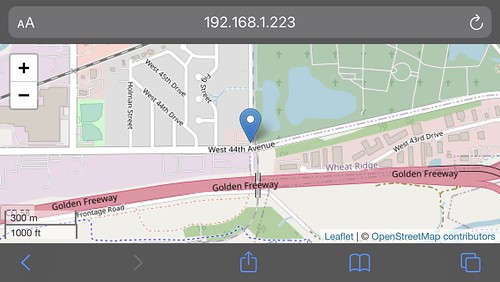
One of the advantages of implementing tools as web applications is that it opens the possibility of running them on a wide variety of platforms, with browsers that support JavaScript and HTML5, with little or no additional effort. I'm a little embarrassed to admit that it just recently occurred to me that I should be able to run my OpenStreetMap (OSM) Moving Map web app on my iPad and iPhone. So I did. It worked fine.

Here is a screen snapshot from my iPad using Safari.

Untitled

Here is one from my iPhone 7, also using Safari.

Untitled

And for good measure, here is a screenshot from my Google Pixel 4 development phone using Chrome under Android 11. It worked fine too.

2021-03-04_12-44-59

I routinely run the web app on Safari, Firefox, and Chrome on my desktop Mac or my Mac laptop, and on Firefox and Chrome on an x86_64 Linux server. Now I can add genuine mobile devices to that list.

But wait! There's more!

I described in prior articles about this project, code-named Tesoro, how the server-side JavaScript program channel.js serves as a conduit between my Hazer C-based GPS software in the field, which forwards geolocation data in JSON over UDP, and my web application whose OSM-based moving map is steered by that incoming data stream. Alas, channel.js only services a single data source at a time (although you can run several instances simultaneously using different UDP port numbers).

Tesoro now includes another server-side JavaScript program, controller.js, that can handle an arbitrary number of geolocation data sources concurrently, all using the same UDP port number, and provide an individual URL for each one for the Tesoro web application. I have an instance of controller.js executing now on one of the Raspberry Pis that runs 24x7 at the Palatial Overclock Estate, serving as the sink for any geolocation project in the field (or for a playback of the dataset collected from any such project), and as the source of that same data for any moving map displays on my internal network.

Wednesday, February 24, 2021

The OpenStreetMap Moving Map In Real-Time

The moving map display I demonstrated in the forty-five minute video in A Moving Map Display Using OpenStreetMap (2021) was the result of playing back a dataset I had collected in 2020 during a test of a u-blox UBX-NEO-M8U, a relatively complex piece of kit that included not only a Global Navigation Satellite System (GNSS) receiver but also an integrated Inertial Measurement Unit (IMU). I wanted to capture a moving map video in real-time just to remind myself that it could be done, so this morning I did just that.

The Overview

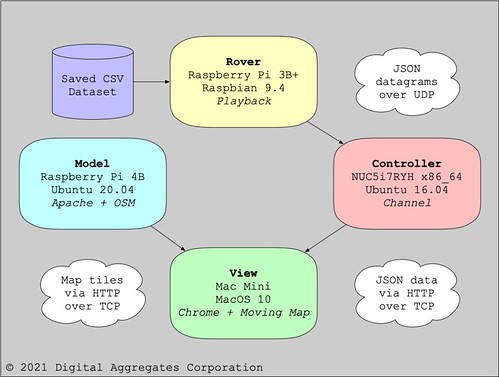
You might recall from that prior article, my implementation consists of four components.

The Rover is either a GNSS receiver connected to a computer running my Hazer gpstool software to collect geolocation data in real-time, or a computer playing back such a dataset.

The Model is an OpenStreetMap (OSM) tile server that serves up graphical map segments and associated metadata via HTTP requests over TCP.

The View is your favorite modern web browser supporting JavaScript and HTML5 that renders the moving map using tiles fetched from the Model as it is steered by the Controller.

The Controller is a conduit that captures the datagrams of JSON data transmitted by the Rover over UDP and makes them available to the rest of the system via HTTP requests over TCP.

Tesoro2

The Model, View, and Controller are all part my Tesoro project.

The Good Stuff

We'll start off with today's fifteen minute (14:49) video, captured on a display at my home base while I drove my Subaru WRX equipped with the Rover around the neighborhood. Feel free to skip around. (If the video doesn't show up for you, you can find it on YouTube. For best results, open the video up in a larger window, and select the High Definition version.)

The Test Setup

The Model was the same Raspberry Pi as before, running the OSM software stack as an Apache web application.

The View was my desktop Mac Mini with a Cinema Display, using QuickTime to capture the video from the Safari web browser running the Tesoro client-side movingmap JavaScript program.

The Controller was the Tesoro channel server-side JavaScript program running under Node.js on another Raspberry Pi. It is the same RPi I use as a Real-Time Kinematic (RTK) corrections server for Differential GNSS (DGNSS) for my Tumbleweed project.

The Rover consisted of a relatively inexpensive USB-connected receiver, a GlobalSat BU-353S4-5Hz, based on a SiRF Star IV chipset. (SiRF is a division of mobile phone chip maker Qualcomm). It was connected to a GPD MicroPC running Hazer's gpstool under Ubuntu MATE. The tiny palmtop computer was equipped with an external NovAtel MiFi USB730L LTE modem that it used to transmit its JSON datagrams containing geolocation data back to home base.

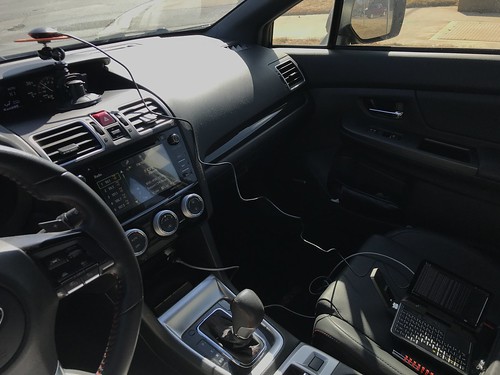
Here is the Rover sitting in the WRX during the test; the GPS receiver is at the far left on a mount on the dashboard, and the PC is sitting on the passenger seat at the far right with the LTE modem visible on its left side.

IMG_4364

Here's a close up of the BU-353S4-5Hz receiver in my lab. The little USB dongle is not much larger than a wristwatch face, and includes the GPS receiver, the active (amplified) patch antenna, and the USB interface which provides both connectivity and power. It's magnetically mounted on a steel plate that serves as a ground plane, a reflective surface for GPS radio waves.

USGlobalSat BU-353S4 GPS Receiver with USB Interface

The GPD MicroPC, shown below on my lap bench with the LTE modem attached on its left side, is basically a pocket-sized ruggedized industrial PC. Although I don't do any touch typing on its chicklet keyboard, I really like the fact that the little Intel Celeron-equipped palmtop incorporates a lot of useful interfaces, including WiFi, an RJ45 Ethernet jack, and an RS232 serial port with a DB9 connector.

GPD MicroPC running Ubuntu MATE

UDP vs. TCP

If you watch the video, and pay attention to the JavaScript console at the bottom, you will notice that the movingmap script occasionally reports missing JSON datagrams. This is typical of my experience in the field using LTE modems and the best effort User Datagram Protocol (UDP) to transmit geolocation updates to the home base. This causes the moving map display to briefly stall and then jump forward as it catches up to the real-time data.

As you might expect, using the guaranteed delivery Transmission Control Protocol (TCP) instead of UDP solves this problem. And indeed, my initial implementation years ago used TCP. But what I found during these kinds of real-time visualizations, especially in locations with spotty cellular reception, is that the display could lag many seconds behind real-time as the TCP/IP stack retransmitted lost packets. And once behind, it never caught up. In fact, it sometimes got progressively worse. It was far better to have the map pointer jump forward than to permanently and increasingly lag behind what was happening in meat-space.

I talked about this at length in Better Never Than Late (2017): in this particular real-time application, it is better to lose packets, or drop packets that arrive out of order, than it is to wait for the network stack to ensure perfect reliability. Besides, my Hazer software saves all the geolocation information on the Rover as a dataset of Comma Separated Values (CSV). So at worst, you can play back the dataset with perfect fidelity when the Rover returns to home base.

(Note: edited several times for corrections and clarity.)

Friday, February 19, 2021

A Moving Map Display Using OpenStreetMap

Google Maps is a treasure. Hardly a day goes by that I don't use it. If I see a news item that interests me that includes an address, or even just a neighborhood, chances are good I'll be looking it up. By the time Mrs. Overclock and I got to Helsinki Finland to attend the World Science Fiction Convention in 2017, I had already "walked" all around the neighborhood of our hotel using Street View.

But although using Google Maps this way for me is free, it is a costly commercial product to develop and support. The maps have to be continuously updated with corrections and changes. The Street View images are routinely laboriously updated and ground truth established by humans driving extensively instrumented vehicles. The Satellite View images are updated frequently enough that I am often surprised to find that the season or the landscaping has changed since the last time I looked at my own neighborhood. It can't be cheap. Google supports this "free" service through a combination of fees for businesses that choose to advertise on this platform, and by licensing its use for products that use this platform for their own mapping needs.

By now, anyone reading my blog has come to realize that I have had a long running, broad, and deep, personal effort at writing applications using the U.S. Global Positioning System (GPS), and more broadly, other Global Navigation Satellite Systems (GNSS). More recently I branched out to include Inertial Measurement Units (IMU). This is part of my Hazer project, the source code repository for which can be found on GitHub. I am understandably interested in mapping the results of my tests, either in real-time or as part of my post-test analysis. Google Maps would have been ideal for this, but the price tag was a little high for something that amounts to an intensive hobby.

In my article Better Never Than Late (2017), I tracked a mobile GPS unit in my car by transmitting its geolocation data back to my home office via an LTE modem, to be mapped in real-time using Google Earth, an application program that provides a programmatic way to use satellite imagery. This worked great; but sometime between 2017 and 2018 the capability to do this in real-time with Google Earth stopped working. I was still able to do the post-test mapping by importing the data into Google Earth in Keyhole Markup Language (KML) form, as illustrated in my article Dead Reckoning (2020). But I wanted a solution for a real-time moving map display.

Recently I became aware of OpenStreetMap (OSM), an open-data, community-driven, project to provide an alternative to Google Maps for exactly the kind of real-time mapping in which I was interested. Thus was born another project, Tesoro, also hosted on GitHub, with the goal of incorporating OSM with Hazer to create a real-time moving map display.

Demonstration

Before I get to the nuts and bolts of Tesoro and OSM, let's go right to the good stuff: a video of the moving map display that I implemented. This is a forty-five minute (45:47) video, so no one (not even me) is going to want to watch all of it. But it's fun to skip around and watch different parts. For best results, watch this video in a separate YouTube window, and if your user interface supports it (not all do), choose the High Definition option so you can read the labels on the map. Opening it up into Full Screen mode helps too. Or be prepared to do a lot of squinting. (If the video below doesn't show up for you, try this link to the video on YouTube.)


This test used a playback of geolocation data I collected during IMU testing conducted on 2020-09-17. The playback mechanism uses the same UDP-based networking to feed the Hazer data stream to Tesoro that I have used previously in the field, so I would expect it to work almost as well with a real-time feed, subject to the occasional data loss I witnessed using LTE modems. (In Better Never Than Late I make the case as to why UDP, and not TCP, is the correct internet protocol to use for this. Alas, an efficient and easy to use method of encrypting and authenticating UDP traffic - while maintaining the characteristics of UDP that I find important - is in my opinion an unsolved problem.)

Overview

Tesoro broadly consists of four components: the Rover, the Model, the View, and the Controller. Web developers will recognize the Model-View-Controller (MVC) nomenclature used to describe a design pattern for interactive applications. GNSS developers will recognize Rover as the mobile portion of a Differential GNSS (DGNSS) system. (As always, you can click on any image to see a larger version.)

Tesoro

Although most of my development of Tesoro was done by running all of these components on a single computer, that didn't reflect how I expect the system to be used in real life. So for the video above, I split the components onto four different computers.

The Rover

The Rover plays the role of the component in the field, running the Hazer gpstool application and forwarding the resulting geolocation data via UDP back to the home base. For this test, the Rover was one of my Raspberry Pi 3B+ development machines running a version of the Debian Linux distro called Raspberry Pi OS (formerly called Raspbian).

gpstool saves geolocation data in a Comma Separated Value (CSV) format so it can be easily imported into a spreadsheet. The Hazer csvmeter script reads the stored CSV data and meters it out at approximately the same rate - typically 1Hz - as it was originally generated by the GNSS receiver under test. The output of csvmeter is piped to the Hazer csv2dgm utility that trivially converts it into JavaScript Object Notation (JSON) - the standard data serialization format used by JavaScript and lots of other applications because it is far simpler than eXtensible Markup Language (XML) - and sends the resulting datagram on its way.

The Rover can be tested by using the Linux/GNU utility socat to receive the datagrams and display them on the console.

The Model

The Model (short for Data Model) provides the database of map data used by the moving map display. The Model is an OpenStreetMap tile server, a server-side web application and database that provides tiles - graphical map segments - via Hyper Text Transfer Protocol (HTTP). It is hosted on a Raspberry Pi 4B computer with a two terabyte (2TB) Solid State Disk (SSD) in addition to its own root file system on a microSDcard.

Untitled

This tiny Single Board Computer (SBC) runs, not the typical Raspbian, but a full blown version of Ubuntu, another Debian-based Linux distro. I chose Ubuntu over the usual Raspbian that I run on the other ten Raspberry Pis that run 24x7 at the Palatial Overclock Estate because the OSM stack was known to work under Ubuntu. Could it run under Raspbian? Got me. When I found out that there were instructions for installing OSM under Ubuntu 20.04, and there was a version of Ubuntu 20.04 that could be installed on the Raspberry Pi 4B, I looked no further. Installing Ubuntu, then the entire OSM stack, then the map data for North America, then building the map database, on the Raspberry Pi was a relatively simple but time-consuming process.

I was careful to keep the map dataset (which is very large) and the Postgres database (which is very active) on the SSD. Given that just today I saw an ad for a one terabyte (1TB) microSDcard, it might be possible to implement a tile server without the SSD.

The Model can be tested by issuing an appropriate HTTP request from a browser or the Linux/GNU command line utility wget and seeing what comes back.

The Controller

The Controller provides the data stream that steers the moving map. It is implemented by channel, a small server-side JavaScript program I wrote that stands up a microscopic HTTP server. The channel receives the JSON datagrams from the Rover via UDP and caches the most recent one. When channel receives an HTTP request of any kind (it's not picky) over TCP, it responds by replying with the latest JSON datagram.

The channel is merely the conduit through which the JSON datagrams from the Rover can be received by the client-side web browser a.k.a. the View. Non-web developers may be surprised (I was) at how difficult this simple requirement is to solve. Browser security is an ever tightening chain of rules and sandboxing designed to keep malicious web sites from stealing your identity or infecting your laptop with malware. A lot of solutions you might take for granted as being feasible are actually deliberately impossible.

JavaScript programs running on the server-side under the standard Node.js compiler/interpreter have no such restrictions, however. I ran the channel JavaScript program on one of my x86_64 Ubuntu development systems, but any Linux/GNU system running Node.js would do.

The Controller can be tested by running channel and then making a web request using a browser or wget.

The View

The View is the visualization engine of Tesoro. It consists of a lot of client-side JavaScript code running inside of the web browser of your choice, being steered by the JSON it periodically fetches via HTTP from the Controller, and then rendering the appropriate map segments it requests from the Model. The View is implemented by a combination of Hyper Text Markup Language (HTML) files that download and run my movingmap JavaScript program. movingmap is built on top of Leaflet (1.7.1), a widely used JavaScript library that provides a client-side API to OSM. It is Leaflet that does all of the heavy lifting with OSM.

The View client-side HTML and JavaScript code (including Leaflet) are hosted on the Model, the OSM tile server, as just another Apache web site application. They are downloaded and executed inside the web browser on whatever computer the browser is running on. You can probably run the View on any modern web browser that supports JavaScript. The video above was recorded with QuickTime using the Google Chrome browser running on my desktop Apple Mac mini running macOS 10 with an Apple Cinema Display. But I have also run the View with Firefox on an x86_64 Ubuntu system, and with both Firefox and Safari on the same Mac.

Tesoro includes several HTML web pages that can be used to incrementally test the View and the rest of the software stack, first displaying a static map at a fixed location, then a static map whose latitude and longitude are specified as a query in the Uniform Resource Locator (URL), then finally as dynamic moving map display being steered by a user-specified channel.

Details

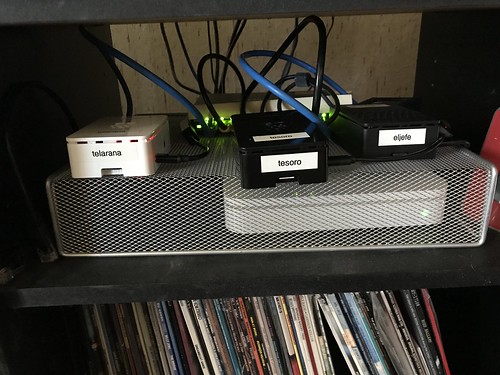
This is an image of the Raspberry Pi that is the OpenStreetMap tile server (center). It resides in an old stereo rack alongside my web server (left), and a Real-Time Kinematic (RTK) update server (right) that is part of my DGNSS project.

IMG_4345

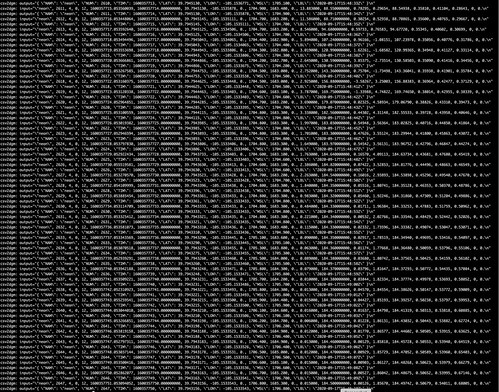
This is the console output of the Rover's csv2dgm utility, which is written in C and is part of Hazer. When debugging output is enabled, csv2dgm displays both the incoming CSV record and the outgoing JSON datagram.

Screen Shot 2021-02-17 at 1.41.37 PM

Although for this example I was playing back a dataset of CSV records previously recorded as part of an actual field test, the same csv2dgm utility is used in the script that runs on the Rover in the field; this output is an easy way to verify that the Rover is generating datagrams before deploying it.

The Controller's channel JavaScript program that runs under Node.js is pretty chatty as well. Every time it receives a datagram over UDP, it displays its JSON payload as well as the sender from which it was received. Every time the View (or anyone else) issues an HTTP request over TCP, the program displays the requestor and the JSON it was sent.

Screen Shot 2021-02-17 at 1.42.52 PM

This output is especially useful since it can be saved as a permanent record on the local computer on which channel runs, independent on to whether the CSV dataset saved on the Rover in the field is eventually recovered.

All three of the web browsers I tested with - Chrome, Firefox, and Safari - have very useful debugging tools built in. In this screen shot from the video above, you can see the moving map on the left, and an optional console log on the right. Tesoro's movingmap client-side JavaScript program makes use of this log to reveal what it is doing. All three browsers have a console log like this, variously called "JavaScript Console", "Web Console", or a "Console" tab on a "Developer Tools" window.

Screen Shot 2021-02-19 at 12.24.55 PM

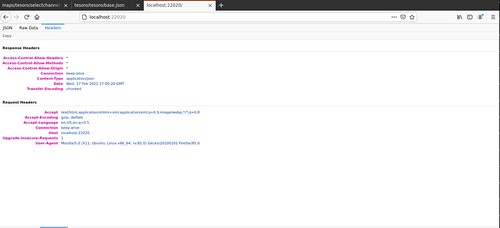
All three browsers also have tools to examine the headers used in the HTTP protocol. This is useful for debugging all three components, Model, View, and Controller, since all use HTTP.

Screen Shot 2021-02-17 at 10.00.57 AM

The README file for the Tesoro repository on GitHub has links to the pages I used to learn how to install Ubuntu on the Raspberry Pi, to install the OSM software stack, to download the map data, and to build the Postgres database, all on the Model tile server.

In addition, the repository includes a text file of mostly unstructured notes that might be useful if you get stuck trying to reproduce my results. Be aware, though, that not all of the notes led to something I actually used or did; some were dead ends.

Conclusions

I'm a little surprised how well this project worked, mostly because I wasn't a web developer when I started it. I'm not a web developer now, either. JavaScript will not be appearing on my LinkedIn profile.

But thanks to having hacked other developer's JavaScript on various paying gigs that had a web component, and to the wealth of documentation I found online, I was able - as usual - to learn from people smarter than myself.

(Note: edited several times for corrections and clarity.)

Tuesday, December 29, 2020

First-Come First-Served Readers and Writers in C using Monitors

And so it came to pass that I needed a solution to the Reader-Writer Problem using POSIX threads and written in C. So that there would be a consistent perception of reality amongst the components of a real-time system, it would be required that the Readers and Writers be given access to the shared resource in the strict order in which their requests were made. So it was, in the fullness of time, I developed such a solution. And I found it was good.

The Reader-Writer Problem

The Reader-Writer Problem (or, sometimes, the Readers-Writers Problem) is a classic concurrency problem in computer science. I studied it in school in the 1980s, but papers were being published about it in the early 1970s, just as computers were large enough to actually run more than one program at a time, and shared databases were becoming commonplace.

A Reader is any algorithm that needs read-only access to a shared resource. That shared resources could be a persistent database, a complex data structure in memory, or just a variable. A Writer is any algorithm that needs read-write access to the same shared resource. The Reader-Writer Problem is all about how you keep Writers from stepping on each other and on Readers as they modify the shared data.

The classic example of this in all the introductory textbooks is your bank balance. An algorithm in the bank computer, Writer A, wants to see if you have enough money in your bank account to cover your ATM withdrawal of $200. It reads your balance, and sees that you have a balance of $500, and tells the ATM to give you your money. Meanwhile, Writer B want to see if you have enough money to cover a check for $400 drawn against your account. It reads your balance, sees that you do, and clears the check. Writer A deducts the $200 from your account. Writer B deducts the $400 from your account... and now you see the problem.

(The thing is: this actually happens all the time. The global banking system is distributed across a huge number of computers, and verifying every single transaction in real-time is too expensive and time consuming. The banking system reconciles all of the transactions at best at the end of the day. So sometimes you overdraw your account. But it works as an introductory example.)

So clearly the act of checking your balance and deducting the money needs to be done as an atomic, or indivisible, operation - without the balance being changed in the middle of the transaction. Hence, only one Writer can run at a time.

If all an algorithm is doing is reading - a Reader that just checks your bank balance - that is an operation that can be done concurrently with other read-only operations. Readers don't step on one another, and many Readers can run at the same time. For reasons of efficiency, there is no reason to block a Reader if only other Readers are running.

A Writer can step on a Reader, too. Perhaps a Reader accesses a shared account database to verify two separate things: that the password that was typed in matches the (probably encrypted) password in the database, and that the login entered has access to the specific resources that the user is trying to use. Both requirements must be met for the login to succeed, but the data that needs to be verified must be accessed in two different read operations. In between those two separate operations, a Writer steps in and processes a Change Password request. The result is that the Reader grants access, even though the password typed in was actually incorrect at the time access was granted.

(That probably happens all the time, too.)

So while multiple Readers can access a shared resource concurrently, Writer access must be serialized - only one Writer can access it at a time - and Readers have to wait until a Writer has completed and vice versa. Note how this is different than just placing each access of the resource, regardless of read-write semantics, inside a critical section protected by a mutex or a semaphore: that would unnecessarily serialize Readers' access as well as that of Writers. If most access is reading - which typically is the case - a Reader-Writer lock is far more efficient than a simple mutex.

Those are the basic rules, or invariants, for the Reader-Writer Problem. But typical solutions to the Reader-Writer Problem are more complicated than that. For example, if you have a constant stream of Readers, the simplest solution to the Reader-Writer Problem starves Writers; they are constantly blocked from modifying the shared resource as long as Readers keep requesting access, because the simplest solution gives Readers priority.

This doesn't really serve Readers either, since presumably a Reader wants the most up-to-date information in the database. Starving Writers really means that the data is old and effectively out of date with respect to the real-world - you have written a lot of checks that have not yet cleared, so your bank balance reflects what an accountant would call its cash basis, not its accrual basis. That makes the data the Readers are reading a lot less practically useful.

Likewise, giving Writers priority can starve Readers if there is a constant stream of Writers wanting to modify the shared resource. That's not useful either, since you have a database with a lot of up-to-date information that Readers cannot access.

So you have to have a balance. The devil is in the details, which is why there are a lot of different solutions to the Reader-Writer Problem, all maintaining the same basic invariants regarding the integrity of the shared resource, but with different scheduling and policy decisions for Readers and Writers. Each solution is designed to meet the requirements of some specific application, or exhibit some specific behavior, like Readers are given priority as long as Writers don't wait longer than some timeout period, establishing a kind of "best if used before" date on the shared data.

And so we come to the requirements for my solution.

My Reader-Writer Problem

I had some specific needs for my solution. Not only did I need to meet the basic invariants of the Reader-Writer Problem, I needed the requests by Readers and Writers to be performed in the time order in which they occurred. Readers can run concurrently, but as soon as a Writer waits for the Readers to complete, all further Readers have to wait. More importantly (and the thing that was the departure from many Reader-Writer solutions), subsequent Readers and Writers that wait must be granted access to the shared resource in the order in which they made their request.

For example, if the order of arrival of Readers (R) and Writers (W) were in the following time ordered sequence (from left to right)

R1 R2 R3 R4 W1 W2 R5 R6 W3 R7 W4 R8

  • R1, R2, and R3 would all immediately be granted concurrent access;
  • then W1;
  • then W2;
  • then R5 and R6 could run at the same time;
  • then W3;
  • then R7;
  • then W4;
  • then finally R8.

Other Reader-Writer algorithms may exhibit higher throughput for Readers, or for Writers, but this approach provides a more consist view of "causality", so that a post-hoc analysis of real-time system behavior agrees with the accepted perception of the order of events. I say "more consistent" and "accepted order" because a perfectly consistent view is impossible. I've written about this in my "Frame of Reference" blog articles, essentially applying Einstein's Theory of Special Relativity to real-time systems. (Computer scientist Leslie Lamport beat me to this idea by more than forty years.)

My Reader-Writer Solution

My solution is implemented in C under Linux using the GNU C library's implementation of POSIX threads, mutexen, and condition variables (and is different in implementation and probably behavior from the pthread_rwlock_t that POSIX provides - POSIX isn't that clear about how it behaves). You can find the source code in my Diminuto C systems programming library, whose Git repository is hosted on GitHub. Or you can follow the links below just to take a quick look at it right now.

diminuto_readerwriter.h

diminuto_readerwriter.c

unittest-readerwriter.c

The POSIX mutex and condition variable features together implement a form of synchronization originally referred to as a "monitor", as distinct from the earlier synchronization primitive, the "semaphore". Specifically, POSIX implements a Mesa monitor, whose behavior matches that of the monitors implemented in the Mesa programming language developed at Xerox PARC in the 1980s. Mesa monitors differ somewhat from the behavior of the original monitors described by C. A. R. Hoare several years earlier. I won't describe the POSIX mutexen or condition variables in detail, or either Mesa or Hoare monitors, but the references can be found below.

The one detail I do need to point out is that POSIX condition variables - a kind of queue on which threads can wait until another thread signals them to resume execution - do not guarantee First-In First-Out (FIFO) order: the order in which threads awaken on a condition variable can be completely different from the order in which they originally waited. POSIX condition variables are not guaranteed to be first come, first served. The order may be be affected by the scheduling priority that the application assigns to each thread, or it may depend on some specific detail of the underlying implementation. In any case, it is undefined in the POSIX 1003.1 specification. That was a problem I had to solve.

(There has been so much published on the Reader-Writer Problem over the decades that I would never claim that this solution is novel. It has undoubtedly been done before, and probably better. But a working implementation in the hand is worth two articles in the unread academic literature.)

(Update 2021-01-04: I found another, earlier, and very different implementation, by Shlomi Fish, which I added to the references at the end.) 

My solution uses one POSIX mutex, two POSIX condition variables (reader and writer), two counters that track the number of active Readers and Writers (reading, which should always be zero or greater, and writing, which should always be zero or one), and a queue used to store tokens (ring, which I implement as a ring or circular buffer).

(Update 2022-01-27: Diminuto library versions 74 and later do not require that the application provide storage for a ring buffer. The ring buffer is replaced by a diminuto_list_t, a doubly-linked "wait list", that is provisioned automatically and managed internally. The parameters to diminuto_readerwriter_init that provide a pointer to the ring buffer and its size have been eliminated. All other details remain the same.)

Once the Reader-Writer lock has been initialized, there are only four basic operations: a Reader can request access, a Reader can relinquish access, a Writer can request access, and a Writer can relinquish access.

Reader Request

When a Reader requests access and there are no active Writers (writing is zero) and there are no tokens on the ring, the reading counter is incremented and the Reader is granted access.

When a Reader requests access and there is an active Writer (writing is one), or if there are tokens on the ring, the Reader appends a READER token (indicating a waiting Reader) to the tail of the ring and waits on the reader condition variable.

When a waiting Reader wakes up, it checks to see if its token is at the head of the ring, and that it has been changed to READING (indicating a ready Reader). If both are true, it removes its token from the head of the ring, and proceeds to access the shared resource. (As we shall soon see, the reading counter will have already been incremented. This is important so that newly arriving Readers or Writers will not see the reading or writing counters as zero before the awakened thread has had time to reacquire the mutex.) If not, it waits again on the reader condition variable.

Just before a Reader exits the critical section that surrounds the Reader request mechanism, it checks to see if there is waiting Reader as the head of the ring. If there is, the exiting Reader changes the token at the head of the ring from READER to READING, increments the reading counter, and broadcasts a signal that wakes up all of the Readers on the reader condition variable. We have to use the broadcast POSIX function - which wakes all waiting threads - instead of the signal POSIX function - which wakes one waiting thread - because we don't know in what order threads will be awakened by POSIX, since FIFO order is not guaranteed.

Reader Relinquish

When the Reader relinquishes the shared resource, it first decrements the reading counter. If the reading counter is not zero, it is done. If the reading counter is zero (indicating there no other concurrent Readers), the relinquishing Reader checks to see if there is a waiting Reader or a waiting Writer by looking for a token at the head of the ring.

If there is a waiting Reader, the relinquishing Reader changes the token at the head of the ring from READER to READING, increments the reading counter, and broadcasts a signal that wakes up all of the waiting Readers on the reader condition variable.

Similarly, if there is a waiting Writer, the relinquishing Reader changes the token at the head of the ring from WRITER to WRITING, increments the writing counter, and broadcasts a signal that wakes up all of the waiting Writers on the writer condition variable.

Writer Request

When a Writer requests access and there are no active Readers or Writers (both reading and writing are zero) and there are no tokens on the ring, the writing counter is incremented and the Writer is granted access.

When a Writer requests access and there are one or more active Readers, or an active Writer, or there are tokens on the ring , the Writer appends a WRITER token to the ring and waits on the writer condition variable.

When a waiting Writer wakes up, it checks to see if its token is at the head of the ring  and that it has been changed to WRITING. If both are true, it removes its token from the head of the ring,  and proceeds to access the shared resource. If not, it waits again on the writer condition variable.

Writer Relinquish

When the Writer relinquishes the shared resource, it first decrements the writing counter. It then checks to see if there is a waiting Reader or a waiting Writer by looking for a token at the head of the ring.

If there is a waiting Reader, the relinquishing Writer changes the token at the head of the ring from READER to READING, increments the reading counter, and broadcasts a signal that wakes up all of the waiting Readers on the reader condition variable.

Similarly, if there is a waiting Writer, the relinquishing Writer changes the token at the head of the ring from WRITER to WRITING, increments the writing counter, and broadcasts a signal that wakes up all of the waiting Writers on the writer condition variable.

Practical Matters

The variables for the Reader-Writer lock are baked into a structure that has its own type definition.

diminuto_readerwriter_t lock;

The structure contains the mutex, the two condition variables, the counters, and the metadata for the ring buffer; the actual storage for the ring buffer is provided by the application in the form of an array that is at least as large as the maximum number of threads that may use the lock at any one time. Each slot in the array is just one byte. No initialization of the array is necessary. (My implementation doesn't have to do any initialization of the array either; the ring buffer metadata insures that the implementation never examines an uninitialized slot in the array.)

(Update 2022-02-01: In addition to the initialization function shown below, Diminuto library versions 74 and above also provide a mechanism for static initialization of the ReaderWriter lock structure. This allows the structure to be automatically initialized by the C run-time static initialization when an application starts.)

There is a function that initializes the ReaderWriter lock structure.

uint8_t ring[64];

diminuto_readerwriter_init(&lock, ring, 64);

Using the Reader-Writer lock is probably the simplest part, since all the necessary code is generated by C preprocessor macros that implement a "bracketing" pattern. These let you use the Reader-Writer lock like this, for Readers:

DIMINUTO_READER_BEGIN(&lock);

/* Read the shared resource here. */

DIMINUTO_READER_END;

or like this, for Writers:

DIMINUTO_WRITER_BEGIN(&lock);

/* Read and write the shared resource here. */

DIMINUTO_WRITER_END;

If one of the underlying POSIX functions fails for some reason (the most likely reason for this is the developer forgot to initialize the lock structure), the section of code bracketed by the macros is not executed. There is no error indication to the application, but it is a simple thing for the application to check that the code was executed. The implementation logs error messages either to standard error, or to the system log if the application has no controlling terminal i.e. is a daemon, so failures are not silent.

Discussion

Why two condition variables, one for Readers, and another for Writers?

Although I haven't tested it, my algorithm should work just fine having all of the waiting threads queued on a single condition variable. The waiting Readers and Writers don't depend on what condition variable they wake up on to know whether they've been granted access to the shared resource. There could be one token indicating READY that the head of the ring is set to, whether from a READER or from a WRITER, instead of the two different ready tokens, READING or WRITING. I think the only difference would be more churn amongst signaled Readers and Writers until all but one thread, the one whose token is at the head of the ring, go back to waiting.

Another approach would be to make every slot in the ring a condition variable. Each waiting thread would wait on its own dedicated condition variable. The signaling thread could signal instead of broadcast, since there would be no ambiguity as to which thread was being woken up. My only concern about this would be the resource usage involved.

I'm not unhappy about my design, so I'm not likely to change it. Using two condition variables seems efficient enough, and using a condition variable per slot in the ring doesn't seem necessary.

My design orders the access to the shared resource independently of the priorities of the calling threads, so it can result in priority inversion (but to not to do so would violate my own requirements).

One of the capabilities I have thought about adding is an optional timeout on the request for Readers and Writers, using a POSIX timed wait. I'm not completely convinced that there is a use case for this, except perhaps when recovering from some failure; how many algorithms have a credible Plan B if the request for the lock times out? It would also require that tokens in the middle of the ring be capable of being be rescinded. This is a lot harder than it sounds. Either the ring needs to be converted into something like a Diminuto List, a circular doubly-linked list (which would greatly increase the size of each slot from one byte to four pointers); or the maximum size of the ring can no longer be calculated (a Reader or Writer may timeout many times, each time adding a token to the tail while leaving an old token on the ring waiting to be removed at the head). I'm still pondering this.

(Update 2021-01-07: And I ultimately implemented the timeout, in part because it made it easier to test the recovery from certain failure scenarios. The timeout is available in the public function API, but not in the wrapper macros. You can find examples of both uses in the unit test. A timeout duration of zero provides a way for the application to poll for the availability of the resource.)

(Update 2022-01-30: As mentioned above, I finally replaced the ring buffer with a Diminuto List. The List node for each thread is automatically dynamically allocated in the thread's local storage and initialized on its first use. It is automatically de-initialized and freed when the thread exits.) 

(Update 2022-01-30: Diminuto library versions 75 and above support an expedited access request which queues the requesting thread at the head of the wait list instead of at the end. This provides a broad variety of alternatives in terms of how threads are scheduled to use the resource.) 

My Diminuto library and the results of its Reader-Writer solution should be pretty easy to reproduce on any modern Linux/GNU system. If this is the kind of thing that overclocks your processor, try it out. Clone the repository. Build the code base. Run the unit test. Peruse the code. See what you think. The unit test has passed on an x86_64 Ubuntu 18.04 platform, and on an ARMv8 Raspian 10 platform.

(Update: I made minor edits, and additions to the Discussion section, since I first posted this.)

For Further Reading

Wikipedia, "Readers-writers problem", 2020-11-23

Wikipedia, "Readers-writer lock", 2020-11-16

C. Overclock, "Frames of Reference IV", 2020-05-22

C. Overclock, "Frames of Reference III", 2020-01-28

C. Overclock, "Frames of Reference II", 2018-04-19

C. Overclock, "Frames of Reference", 2018-03-14

pthread_cond_timedwait, pthead_cond_wait, Open Group Base Specification Issue 7, 2018 edition, IEEE Std. 1003.1-2017, 2018

pthread_cond_broadcast, pthead_cond_signal, Open Group Base Specification Issue 7, 2018 edition, IEEE Std. 1003.1-2017, 2018

S. Fish, "A First-Come First-Served Readers/Writers Lock", 2009-04-18

B. Lampson, D. Redell, "Experience with Processes and Monitors in Mesa", Communications of the ACM, 23.2, 1980-02

L. Lamport, "Time, Clocks, and the Ordering of Events in a Distributed System", Communications of the ACM, 21.7, 1978-07

C. Hoare, "Monitors: An Operating System Structuring Concept", Communications of the ACM, 17.10, 1974-10

P. Courtois, F. Heymans, D. Parnas, "Concurrent Control with ''Readers'' and ''Writers''", Communications of the ACM, 14.10, 1971-10


Monday, December 14, 2020

Old Dog, New Tricks

In their article "File Descriptor Transfer over Unix Domain Sockets" in their blog CopyConstruct, distributed systems engineer Cindy Sridharan references an article by Facebook engineers and others that appeared in the proceedings of a virtual ACM conference: "Zero Downtime Release: Disruption-free Load Balancing of a Multi-Billion User Website" [Usama Naseer et al., SIGCOMM '20, 2020-08-10]. It's a real eye opener. I thought I was pretty conversant with the socket interface available in Linux, having been doing that kind of interprocess/interprocessor communication since my 4.2 BSD days on a VAX-11/750. Apparently I have some catching up to do.

Sridharan's article points out that you can transfer open sockets from one process to another, running on the same computer, via a UNIX domain socket, in the address family AF_UNIX (a.k.a. AF_LOCAL). UNIX domain sockets (or what I typically refer to as "local sockets") only work between endpoints on the same computer. Instead of using an IP address and port number, the rendezvous between endpoints is identified using a unique name in the file system namespace. Local sockets are have been around for eons, but I was not aware of this use for them.

What this is not is a child process inheriting a file descriptor from a parent process. This is sending a message over a local socket from one process to another that effectively results in a dup(2) system call on the receiving end for one or more file descriptors from the sending end that are specified in the message. The system calls involved are sendmsg(2) and recvmsg(2).

ssize_t sendmsg(int sockfd, const struct msghdr *msg, int flags);

ssize_t recvmsg(int sockfd, struct msghdr *msg, int flags);

Even the socket type was a new one on me: SOCK_SEQPACKET, which exchanges a message having fixed boundaries like a datagram, but which has guaranteed delivery like a TCP socket.

int listensocket = socket(AF_UNIX, SOCK_SEQPACKET, 0);

I had used sendmsg and recvmsg with struct msghdr before, to send and receive vector I/O using datagrams. You can find examples of this in my test program unittest-ipc-scattergather.c that I described in a previous article "Scatter/Gather".

But struct msghdr has additional fields that can be used to transmit additional ancillary information (the term used in the manual page). This includes control messages like SCM_RIGHTS, which enables the transfer of open file descriptors across process boundaries. (You still have to transmit at least one byte of conventional data, even if it is ignored by the far end; the control message tags along.)

You can find the test program described here at unittest-ipc-ancillary.c. In that program, there is one "main" process, one "workload" process, and four "instance" processes. 

The workload process manages a pool of sixty-four client threads. Each active client thread is trying to connect to the same listen socket identified by an IP address and port number. When the connection is established, the client writes one or more requests, and for each request reads a response from the server on the far end. Then the client closes the connected socket, returns itself to the thread pool, and ends. The workload process continuously waits for a client thread to appear in pool; it removes it from the pool and starts it.

Each instance process uses sendmsg to send a message to the main process over a local socket asking for the listen socket. The listen socket is a conventional socket identified by an IP address and port number, and has pending client threads waiting for their connection to be accepted. The main process receives the request using recvmsg and replies using sendmsg with its open listen socket to one instance process at a time until that process exits and its status is waited for by the main process. Then the connection request of the next instance process is accepted, and it is sent the same open listen socket.

Each instance process manages a dispatcher thread. The dispatcher thread continuously accepts connection requests on the listen socket from client threads, and assigns each new stream socket to one of eight server threads that it has started from a thread pool. When the client thread closes its end of the socket, the server thread returns itself to the thread pool and ends. During a single activation, a server thread services a sequence of requests from a single client.

The main process that drives the test gives each of the eight instance process ten seconds to service as many clients as it can before it is signaled by the main process to exit.

Here is a code snippet lifted from that test program for the sending side. diminuto_ipcl_packet_send() is the function in my Diminuto library that calls sendmsg.

struct iovec vector[1];

struct msghdr message;

union { struct cmsghdr alignment; char data[CMSG_SPACE(sizeof(int))]; } control;

struct cmsghdr * cp;

char dummy[1] = { '\0' };


vector[0].iov_base = dummy;

vector[0].iov_len = sizeof(dummy);

message.msg_iov = vector;

message.msg_iovlen = countof(vector);

message.msg_control = &control;

message.msg_controllen = sizeof(control);

cp = CMSG_FIRSTHDR(&message);

cp->cmsg_level = SOL_SOCKET;

cp->cmsg_type = SCM_RIGHTS;

cp->cmsg_len = CMSG_LEN(sizeof(listensocket));

memcpy(CMSG_DATA(cp), &listensocket, sizeof(listensocket));

ASSERT(diminuto_ipcl_packet_send(activationsocket, &message) == sizeof(dummy));

Here is a code snippet from the receiving side. Similarly, diminuto_ipcl_packet_receive() calls recvmsg. Note that the value returned by both sendmsg and recvmsg is the length of the dummy payload, not the length of struct msghdr or struct cmsghdr.

char dummy[1];

struct iovec vector[1];

struct msghdr message;

union { struct cmsghdr alignment; char data[CMSG_SPACE(sizeof(int))]; } control;

struct cmsghdr * cp;

ssize_t length;

int listensocket = -1;


vector[0].iov_base = dummy;
vector[0].iov_len = sizeof(dummy);

message.msg_iov = vector;
message.msg_iovlen = countof(vector);

message.msg_control = &control;
message.msg_controllen = sizeof(control);

ASSERT((length = diminuto_ipcl_packet_receive(activationsocket, &message)) == sizeof(dummy));

for (cp = CMSG_FIRSTHDR(&message); 
     cp != (struct cmsghdr *)0; 
     cp = CMSG_NXTHDR(&message, cp)) {
  if (cp->cmsg_level != SOL_SOCKET) { continue; }
  if (cp->cmsg_type != SCM_RIGHTS) { continue; }
  if (cp->cmsg_len != CMSG_LEN(sizeof(listensocket))) { continue; }
  memcpy(&listensocket, CMSG_DATA(cp), sizeof(listensocket)); break; 
}

The test program is constructed such that the listen socket being passed to each instance process doesn't even exist when the instance processes are forked. The only way the listen socket could be known to the instance processes is via the control message mechanism.

This is a remarkable capability. I own Cindy Sridharan a debt of gratitude for bringing it to my attention.

Addendum (2020-12-15)

Fazal Majid was kind enough to pass along the fact that this capability has been around for a long time, and cited a classic reference that I have on my bookshelf just a couple of feet away.

W. Richard Stevens, Stephen A. Rago, Advanced Programming in the UNIX Environment, 2nd ed., Addison-Wesley, 2005

It took me a few minutes to find it: 17.4.2, "Passing File Descriptors over UNIX Domain Sockets", pp. 606-614. I'm embarrassed to admit I missed this. In my defense, the book is 927 pages long. A big thank you to Mr. Majid for pointing this out.

Addendum (2020-12-16)

The SOCK_SEQPACKET socket type looks pretty interesting, doesn't it? It has the reliability of SOCK_STREAM with the fixed message boundaries of SOCK_DGRAM. Why don't we see it used more? Because underneath the hood it uses neither the Transmission Control Protocol (TCP) used for streams, nor the User Datagram Protocol (UDP) used for datagrams, the two transport-layer protocols on which most of the Internet is based. Instead, it uses the Stream Control Transmission Protocol (SCTP) developed for Signaling System 7 (SS7), the telecommunications protocol stack used to set up and tear down telephone calls in the Public Switched Telephone Network (PSTN). SCTP is defined in RFC 4960. SCTP isn't as widely deployed in the Internet at large as its peers in the transport layer. I'm not confident SCTP packets would make it through all firewalls. And it's not that hard to parse out fixed size messages from TCP streams. Diminuto provides an API to create a sequential packet socket only for the UNIX domain (local) address type, where it might be useful for inter-process communication on the same computer.

Tuesday, December 08, 2020

Scatter/Gather

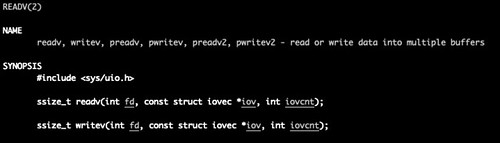
The Linux kernel has a variety of I/O system calls that can be used to write data to and read from a file, device, or network. Which system call you use depends in part on how you want to treat the data, for example as as an unformatted (to the kernel anyway) stream of bytes, or as a fixed length datagram. Recently I was reminded of the readv(2) and writev(2) system calls, which read and write vectors of data which reside in non-contiguous areas in memory.
(Click on any image to see a larger version. Or any version of all, since Blogger doesn't alway play well with Flickr.)
readv writev

These calls take, not a pointer to a buffer and a length in bytes, as is typical of other I/O system calls, but a pointer to an array known as an I/O vector (not to be confused with an interrupt vector), and a count of the number of positions in the array. (The readv and writev system calls are for streams; there are similar system calls, recvmsg(2) and sendmsg(2), that you can use for datagrams.)

Every array position in the I/O vector is an iovec structure. Each iovec structure contains a pair of fields: a pointer to the data to be written or a buffer into which data will be read, and the length in bytes of the data to be read or written.

iovec

I take it from the comments in the header file that readv and writev were originally adapted from the Berkeley Software Distribution (BSD), a UNIX variant I cut my teeth on decades ago on a DEC VAX-11/750. But it was later, at the National Center for Atmospheric Research in Boulder Colorado, where I was introduced to vector I/O, which was used to read and write ginormous lists of floating point numbers used in the specialized vector supercomputers at that national lab. Those high performance machines could do many identical floating point operations in parallel on those data vectors, multiplying and dividing dozens of numbers together all at once. I'm told vector I/O also has its place in high performance graphics hardware.

But my interest in vector I/O comes from the many years I've spend working in protocol stacks for technologies, like Asynchronous Transfer Mode (ATM) and cellular base stations, in the telecommunications industry.

Vector I/O

Supposing you want to transmit a packet whose wire format - what it looks like as it is transmitted over the network, not necessarily what it looks like in memory - looks like this. (This is a pretty simple example compared to typical network protocols.)

WireFormat

The wire format has five fields: a four-byte IPv4 address, a two-byte port number, an eight-byte payload length (which would be overkill for sure), a variable length payload, and finally a two-byte (sixteen-bit) checksum.

These fields may not be in a contiguous location in memory in the protocol stack. In fact, because of memory alignment requirements for the different fields, it may be impossible for them to be contiguous without copying each field byte by byte into a buffer as character data. Furthermore, the way protocol stacks are designed, these fields are probably not managed by the same software layers. By way of a trivial example, when creating an outgoing packet: one layer dealing with the application and business logic generates the payload; another layer responsible for packaging the payload and insuring it arrives intact adds the length field to the beginning and the checksum to the end; and a third layer whose duty is to route the data to the recipient adds the address and port number to the beginning.

One way I've seen this handled in production software is to do a lot of data copying and recopying. That tends to be expensive in terms of time and memory usage. Another way (which I thought was pretty clever, I wish I'd thought of it) was to use double-ended buffers: a single buffer was passed through the layers, the application put its payload more or less in the middle of the buffer, and each successive layer prepended and appended fields to either end. This still involves a lot of data copying from application variables into a contiguous buffer. I wondered if I/O vectors could be yet another approach to solving this problem.

You may have read or heard about zero-copy I/O. This is not that. Vector I/O is a way to eliminate copying in the application from variables to a buffer. Zero-copy I/O is a way to eliminate copying between user space where the application runs and kernel space where the device driver runs. For example: the application makes a zero-copy system call to write a buffer out to a device, file, or network. Instead of making a copy of all the application data from user space to kernel space and then releasing the application buffer, the kernel instead takes ownership of the application buffer, and later asynchronously notifies the application that the I/O is complete. The application can't mess with its own buffer until this notification arrives. It's possible to use both vector I/O and zero-copy I/O to avoid both types of copying (although my test program doesn't do that).

The application using writev instead populates an iovec array with pointers to, and the lengths of, each data field. When the data is ready to be written onto the wire (file, device, or network), the writev system call steps through the array and writes each field one by one in order. (The Linux implementation makes sure this operation is atomic, so a writev running in one process or thread can't intermingle fields with another concurrent writev.)

For our example packet above, the iovec array would look like this.

IOVector

Vector reads work similarly: the application using readv prepares an iovec array containing empty buffers and their lengths into which data will be read.

That's why this technique is sometimes referred to as scatter/gather: data read serially off the wire is scattered into separate memory locations instead of into a single contiguous buffer; data written to the wire is gathered from separate memory locations and serially written onto the wire.

I wanted to try out the various vector I/O system calls in Linux, so I wrote a little program to do just that. But I didn't want to do anything as prosaic just using iovec arrays. That would be too simple. I decided instead to try out an idea I've had for a long time: using a linked list to pass the data through the various software layers of a simulated protocol stack. And not any linked list, but the doubly-linked diminuto_list_t data structure I implemented in my Diminuto C systems programming library many years ago.

Lists

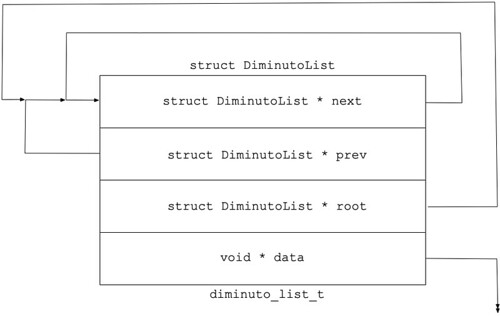
The Diminuto List implements a doubly-linked list - a linked list in which each node has a pointer to the next item on the list, as with a singly-linked list, and a pointer to the previous item on the list.
(You can find the source code for the Diminuto List implementation on GitHub at diminuto_list.h and diminuto_list.c.)
diminuto_list_t

Singly- and doubly-linked lists are familiar to anyone who has taken Data Structures 101. Doubly-linked lists have an advantage over singly-linked lists in that a node can be removed or inserted anywhere on the list. Diminuto Lists (or just Lists, with a capital L, for brevity) have a few other features besides the next and previous links.

DiminutoList

Each node on a List also has a link to the root of the list. This means that given any node on a List, you can find out what List it's on without traversing the List back to the root. So you can do things like trivially prepend or append a new node onto the same List as another node.

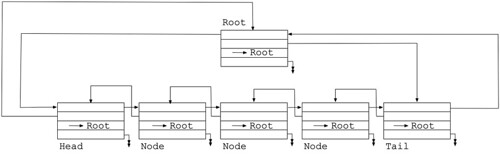
Diminuto Lists don't use null pointers, except for the data payload pointer, or as a returned value to indicate a specific condition. Lists are circular doubly-linked lists. The previous pointer on the node at the head of the List points back to the root note; the next pointer on the node at the tail of the List also points back to the root node. You know a node is at the head of the list because its previous pointer and its root pointer are the same. Similarly, a node is at the tail of the list because its next pointer and its root pointer are the same. When you insert a new node onto a List, that node inherits the root pointer from the node after which it was inserted.

Every Diminuto List node has a void * pointer that can point to a data payload. You can use this field by allocating nodes and payloads separately, and have each node point to its corresponding payload, whatever that is. Or you can embed an diminuto_list_t node structure as a field in the payload structure itself, and either ignore the data pointer, or use it to point to the beginning of the payload. You can have multiple node structures in a payload structure, so that the payload can exist on multiple Lists simultaneously; each node's payload pointer can point to the beginning of the containing structure; this eliminates the need to know which node structure you are using in a payload structure in order to compute the address of the beginning of the payload structure.

The root of a Diminuto List is just another node. You know it's the root node because its own root pointer is pointing to itself. Your application may choose to use the payload pointer in the root node for something, or just ignore it.

When a List node is newly initialized it looks like this.

InitializedNode

The node's next pointer, its previous pointer, and its root pointer are all pointing to itself. It is in effect the root of an empty List. Whether it remains a root node depends on whether another node is inserted onto it (then it is), or it is inserted onto another List (then it isn't).

As you insert nodes, the next and previous pointers in the inserted node and the adjacent nodes, as well as the root pointer in the inserted node, are all adjusted appropriately. Similar when you remove a node. Because a List is circular, there are no special cases about inserting, removing, appending, or prepending, a node on a List. And you can splice an entire List into another List; the root pointers in the spliced List will all be rerooted to point to the root of the List onto which it is being spliced. You can cut out a sub-List from an existing List, and reroot that new List to a new root node.

If you have a Diminuto List with five nodes plus the sixth root node, it looks like this. (I abbreviated the root node pointers so as to not make the diagram too tangled.)

FiveNodes

I don't use Diminuto Lists for everything: the overhead of the four pointers is overkill for applications where one suffices. But they have proven remarkable flexible. So it seemed like a good idea for this experiment.

Gather

The idea here is that different layers in the protocol stack incrementally build a packet by putting the value of each field to be transmitted into a payload buffer associated with a List node, then prepend or append (or even insert or replace) that node onto a List that will eventually represent the entire packet. When the packet is completely built, the application hands off the root node to a function which walks the entire List to build an I/O vector, and then passes the vector to a system call to put on the wire. 
(You can find the source code for this test program on GitHub at unittest-ipc-scattergather.c.)
The highest layer of the stack puts a node whose data payload pointer points to a buffer containing the data to be transmitted. In my test program, these buffers are allocated from a pool (as are the List nodes, from a different pool), and each buffer has a length field at its beginning. The start of the data field of a buffer from the pool is eight-byte aligned, so that its address can be cast to be a pointer of an application variable or structure; that pointer can be used via indirect addressing without copying values. In my test program, the root node is referred to as a record, and the nodes with payload buffers are called segments.

The record is, of course, initially empty. Once the payload segment is put on the record, the record looks like this.

OneField

The next layer of the stack prepends a segment at the beginning of the record that contains the length of the data to be transmitted in an eight-byte field. (The length is just taken from the length field in the payload segment's data buffer). It appends a segment to the end of the record that contains a two-byte Fletcher-16 checksum field that it computed from the payload data. The record now looks like this.

ThreeFields

The record gets passed to another layer that prepends two segments to the beginning of the record: one containing a four-byte IPv4 address, and another containing two-byte port number.


FiveFields

The record gets passed to a final layer that interrogates the address and port segments of the record to get the destination to which the record is to be sent. It then passes the record along with this information to a function which vectorizes the record: the function just walks the List from front to back, interrogating each segment for a pointer to the beginning of its data buffer and the value in that buffer's length field. It shoves each of these pairs of data into successive positions in the I/O vector. (This is the same figure as seen above.)

IOVector

It then calls the appropriate system call, writev(2) for streams or sendmsg(2) for datagrams, which puts the resulting serialized packet on the wire. (This is also the same figure as above.)

WireFormat
This completes the gather portion of the I/O. (With the appropriate abstraction and packaging into supporting functions, this was all a lot easier to code than it sounds.)

Scatter

The scatter portion of the I/O is almost the same operation, but done in reverse. But there is a complication: the payload portion of the packet is variable length, so the application has no way of knowing ahead of time what how large a data buffer to assign to the segment the represents that payload field, or what length to put in the I/O vector for the system call.

For datagram sockets, I solved this problem by having four segments, for four fields - address, port, length, and payload - instead of five. The last segment has a data buffer that is large enough to contain the largest possible payload and the two-byte checksum. The datagram receiver in the test program has to extract the checksum from the end of the payload buffer once the length is known. Because, like all good software developers, I'm a little OCD, I added the checksum as another segment which I appended to the record, and adjusted the length field in the payload data buffer by two bytes.

This solution doesn't work for stream sockets, because if there is a second packet behind the one we are receiving, the beginning of that packet would be read into the larger payload buffer past the data of the prior packet. I solved this problem by doing two vector I/O operations: the first reads the address, port, and length; once the length is known, the second reads the payload and the checksum. This solution isn't possible for datagram sockets, since datagrams are transmitted and received as a single unit.

Or you can ditch the entire vector I/O scheme on the receiving end completely. As my test program illustrates, the sender can transmit the packet using vector I/O, but the receiver can receive the packet using any appropriate scheme it wants. My test program implements a variety of ways of doing this for both stream and datagram sockets.

Remarks

I wrote the unittest-ipc-scattergather.c test program as a sort of audition for adding this kind of capability to the mainstream Diminuto library. I'm not convinced that it has broad enough applicability to make that worthwhile. But I rest easier knowing that I have a usable List-vector I/O scheme with a working example in my hip pocket.

Update (2021-03-19)

Today I made the scatter/gather capability a mainstream Diminuto feature. The function and type names have been changed to reflect the canonical Diminuto style. The feature now supports both IPv4 and IPv6 sockets. Additional unit tests have been added. The unit tests are now part of the sanity test suite for Diminuto. All sanity tests pass.